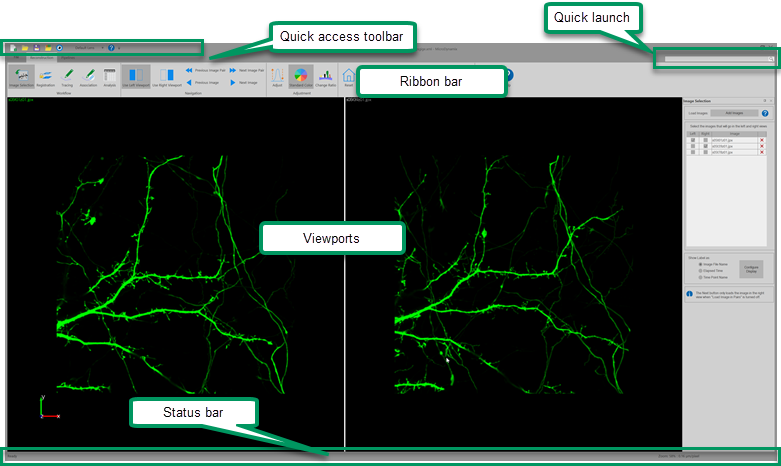
MicroDynamix windows
Browse the slideshow (below) to learn about the components of MicroDynamix software.
-
The Quick Access toolbar at the top left of the Main window provides easy access to the tools you use frequently.
-
Right-click any tool in any ribbon and click Add to Quick Access Toolbar.
-
Use the right-click menu to remove tools or reset the Quick Access toolbar to its default.
-
-
Use the Quick Launch to find tools/commands easily. Start typing in the Quick Launch box and a list of relevant commands/tools will be displayed. Click the desired command/tool to launch it.
-
The Ribbon bar functionally groups the main tools at the top of the screen (see next slide).
-
The Viewports display your images and reconstructions (see later slide).
-
The Status bar at the bottom of the MicroDynamix software window reports ongoing processes and alerts you if there are problems. Learn more about the Status bar.
Ribbon bar
The ribbon bar includes functional tool groupings, including the File menu, and the Reconstruction and Pipelines ribbons.
-
The File menu includes file opening and saving tools, preferences, and other useful tools.
-
The Pipelines ribbon houses the Batch pipeline that enables you to apply image filters to a single image file or hundreds of files at once.

-
The Reconstruction ribbon (pictured above) includes most of the tools you will need to analyze changes in dendritic spines over time. It includes the following tool groups, plus the Close All docked windows button and a big blue button that links to this User Guide.
-
Workflow group:
-
Add your timecourse images and automatically register them to each other and adjust the registration (alignment) if needed
-
Trace and detect trees and spines and automatically create associations between structures seen at different time points
-
Review and refine tree and spine associations between time points
-
Analyze the differences over time
-
-
Navigation group to maneuver your images in the viewports and specify which is the active viewport
-
Adjustment group to change the display of your images and the color scheme used for modeled spines
-
Tools group is a collection of other tools that are useful for viewing your images and data from different perspectives, showing, hiding and removing reconstructed trees and spines, and taking snapshots of the screen.
-
You can hide the ribbon to expand your working space (double-click the ribbon bar area to show/hide the ribbon bar).
Viewports
There are two 3D viewports so that you can view two images side by side to compare two time points. Learn how to maneuver images in the viewports here.

File menu
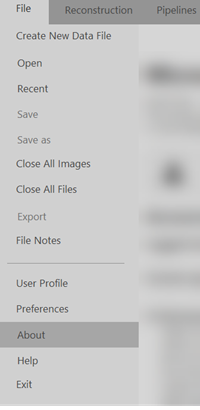
In addition to typical commands, such as Open, Save, Close, and Export, the File menu lets you access settings for User Profile and Preferences.
Light and dark interface themes
Go to File > Preferences > Display and choose your preferred MicroDynamix software theme.
-
The Dark theme was developed for working with fluorescence images
-
and the Light theme for brightfield images.
