Auto-calibration
Purpose
Auto-calibrating the SLICE system helps precisely align camera orientation and enables the system to accurately measure structures in microscopy specimens by determining the µm to pixel ratio for the microscope lens. The auto-calibration process also identifies stage microalignments needed to keep the camera and stage precisely aligned.
How it works
Auto-calibration uses registration of acquired images at known stage positions to accurately determine the scale factor and aspect ratio of the microscope objective and assign it to the associated software lenses. Auto-calibration must be done for each software lens, including software lenses set up with 1x1, 2x2, and 3x3 pixel binning.
See also Calibration Panel .
When to calibrate
We recommend calibrating your microscope system:
-
Following a regular schedule; many laboratories and core facilities establish schedules for microscope-system calibration.
-
After moving or inadvertently jostling the microscope.
-
After installing or removing microscope hardware. (For new lenses, you must create a software lens in order to calibrate it; see Creating a lens.)
-
If 3D image-volume reconstructions show signs of image-tile misalignment.
Material needed
-
5/64” hex key (Allen wrench) that is included in the SLICE accessory box
-
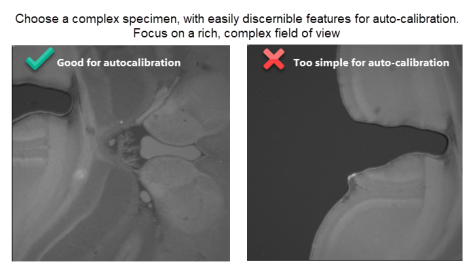
A complex field of view from a non-uniform specimen: Auto-calibration requires a non-uniform specimen with distinct features to work properly; the more complex, the better. Click the thumbnail to expand the image and view example fields-of-view that do and do not work well for auto-calibration.
Overview video
Watch a video (1:15) showing the SLICE auto-calibration process
Auto-calibration procedure
-
Power on the SLICE system and load a sample with distinctive, unique features on the microscope.
-
Navigate to a complex region of the specimen and bring it into focus as follows:
-
 Click Live Image on the Acquire ribbon to display the camera feed onscreen.
 -
Turn on the appropriate laser for the fluorophore in the sample by clicking next to Red, Green, or Blue in the SLICE Light Sheet panel.
-
Move the sample using the Software Joystick and adjust the Offset for the light sheets to see clear, high-contrast structures.
-
Increase excitation intensity in the SLICE Light Sheet panel, and Exposure time and camera Gain in the Camera Settings until the Camera Histogram approaches full dynamic range.
-
-
 Go to File > Calibration and click Auto-calibration in the window that opens.
The Select Lenses for Calibration window opens.
Select one software lens at a time for auto-calibration; selecting more than one lens will result in auto-calibration errors in some cases.
-
For the currently active lens, type in the magnification value (e.g., 10 for a 10x lens).
The currently active lens is shown in the dropdown menu at the top left of the main BrightSLICE window in the Quick Access bar.
-
Click in the Auto-calibration window that opens, after confirming that the information is correct.
-
The auto-calibration starts and a progress bar is displayed.
-
-
When the auto-calibration process finishes, a BrightSLICEwindow is displayed indicating:
-
Auto-calibration completed. The calibrated lens name(s) is listed, followed by the lens scaling (µm/pixel) in X and Y, and the angle of camera rotation in degrees.
-
Auto-calibration did not complete for one or more of the lenses.
This can happen when the field of view is not suitable for auto-calibration. Move to a different region of the specimen and/or increase the signal level (as described in step 2.d. above). Auto-calibration requires a complex field of view with distinctive features, and good contrast.
-
-
Review the Camera Rotation result:
-
If the Camera Rotation is ±0.2, auto-calibration for the lenses selected is complete!
-
If the Camera Rotation is greater than ±0.2, proceed to the next step.
-
Click to close the window.
-
-
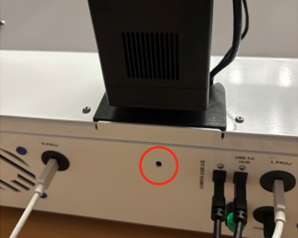
To rotate the camera, slightly loosen the camera-mount screw, shown circled in red in the photo below, using the 5/64” hex key (from the SLICE microscope accessory box).
-
Rotate the camera as follows, depending on the auto-calibration results:
-
To correct negative Camera Rotation (i.e., <–0.2), gently rotate the camera clockwise.
-
To correct positive Camera Rotation (i.e., >0.2), gently rotate the camera counterclockwise.
-
-
Repeat the auto-calibration and adjust the camera rotation as needed to get the Camera Rotation result to ±0.2.
-
Once the auto-calibration is complete, firmly secure the camera using the 5/64" hex key.
-
-
Repeat steps 3-6 for all lens profiles, including 1x1, 2x2, and 3x3 binning modes.
To change the pixel-binning mode of the software lens:
-
 Click More settings in the Camera Settings panel to open the More Settings: Lumina 26 window.
 -
On the Binning and Cropping tab, use the Binning dropdown menu to select the next binning mode to calibrate, e.g., 1x1, 2x2, or 3x3.
Check that the active software lens displayed in the Quick Access pane reflects the change in pixel-binning.
-