Image adjustment
Purpose

|
The Image Adjustment panel enables you to change how the current image looks on screen. To open Image Adjustment, click Adjustment on the |
If you perform any image adjustment on a projection, you'll need to toggle the projection off and then back on in order to refresh the projection image.
Histogram
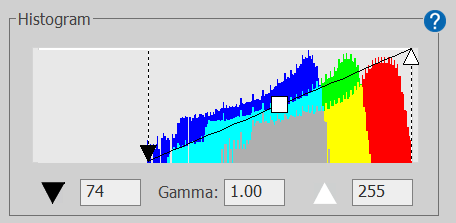
The histogram shows both a bar graph of the image data and a line that represents how the data set is mapped into a display image. 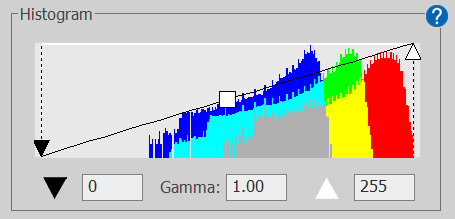
| X-axis | Y-axis | |
|---|---|---|
| Image-data bar graph | Pixel-intensity value | Number of pixels |
| Mapping into display image | Pixel-intensity value | color value (black is 0, white is 255) |
You can adjust image appearance by typing values into the boxes below the histogram or dragging the controls on the histogram:
- Black point (black triangle): The black point is the pixel intensity that defines the lower end of the intensity/color mapping range. In the histogram above, there are no pixels at the lower end of the X-axis, so it may improve image display to drag the black point to where the bar graph shows that image data are present:
- Gamma (white square): Use Gamma to adjust color mapping intensity in a non-linear fashion. This effectively emphasizes either the darker (gamma ≤1) or lighter (gamma ≥1) pixels in the image.
- White point (white triangle): The white point defines the upper end of the intensity/color mapping range. Similarly to black point adjustment, you may want to drag the white point to where the upper pixel intensity value has associated image data.
Bit depth drop-down menu
Select a value from the drop-down menu to view the image at a lower bit depth.
-
This option is available for images with a native bit depth greater than 8.
-
Reducing the bit depth of an image (intensity/color mapping range) may make it easier to adjust the black and white points.
Display
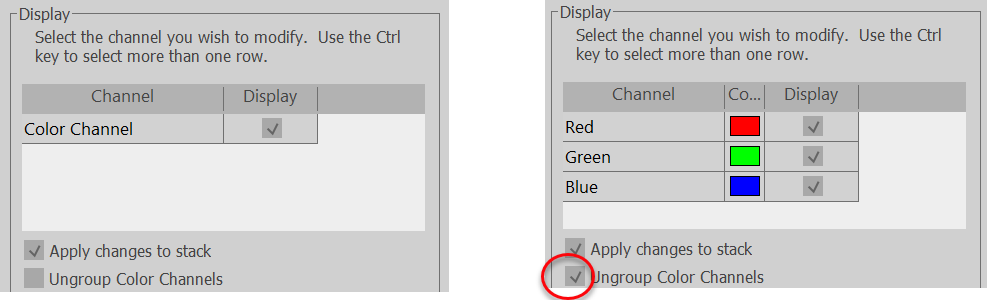
Color-channel table
Color channels present in the image are shown in a table, with one row for each channel:
-
Channel: The first column in the table lists the channel name.
-
Color: The second column shows the selected color representation for the channel. Click the color to open the color changer and select a different color if desired.
-
To view more options for color representation, click the Show Options button and clear the checkbox for Use Simple Color Pickers when selecting colors.
-
Note the Color Maps section of the color picker. These are color gradients that can enhance image display and make it significantly easier to "see" features in images quickly.
-
- Display: Check/uncheck the box in the third column to display/hide a color channel.
Other Display controls
-
Apply changes to stack: Check the box to apply changes to each image in the image stack. When the box is cleared, changes are applied only to the current image.
-
Ungroup Color Channels: Check the box to list each color channel in multi-color channel images and enable individual color channels to be selected and/or modified.
-
Apply to images checked in Image Organizer: When the box is checked, changes are applied to all images in the Image Organizer selected with a check-mark.
-
You can display either Brightness and Contrast or Gain and Offset controls. To choose:
-
Click the button to show the Display Options panel.
-
You can choose to Work with either Brightness/Contrast controls or Gain / Offset controls by clicking the corresponding radio button.
-
Buttons
-
Resets the image to its original settings up to the last save.
-
Sets the Black Point to 0 and the White Point to the highest value available for the image type.
-
For an 8-bit image, the highest White Point value is 255.
-
For a 12-bit image, the highest White Point value is 4095.
-
-
Sets the black and white points to the lowest and highest appropriate values, respectively.
-
Click to show or hide Display Optionsand Optimization Options.
Options
These controls become visible when you click .
Display options
-
Show Luminance: Check the box to calculate luminance from color images (when possible) and display it on the histogram. Note that this is only available if the channels are grouped.
-
Always ungroup Color Channels: Check the box to ungroup color channels when opening images.
-
Use Simple Color Pickers when selecting colors: Check the box to display a set of colors to choose from for the color channels. Clear the box to enable the selection of additional color choices.
-
Work with: Radio buttons enable you to choose whether to use either Brightness/Contrast controls or Gain / Offset controls
Optimization Options
-
Optimize images of a stack individually: The default behavior is to apply image-optimization adjustments to the image stack as a whole. Check the box to optimize each image in the stack individually.
-
Click to view and/or adjust the settings used for image optimization or reset them to the default values.
Saving image adjustments
| Image Only | Stack | Command | Also Required |
| √ | File>Save as>Image Stack>Stack | ||
| √ | File>Save as>Image | ||
| √ | File>Save>Image Stack>Stack |
Adjust Preferences> Images: Under Save, check the boxes next to: "When writing image files..." "When saving only image display adjustments..."
|
|
| √ | File>Save>Image |
