Acquire an image stack
Purpose

|
Acquire an image stack from the current field of view. This creates a single image file comprised of a series of stacked image planes that represent z-planes of the specimen. |
See also Image Stack overview
Procedure
-
 Click Image Stack on the Acquire ribbon.
The Stack acquisition panel opens.
-
Review the image-acquisition parameter choices and, if they suit your needs, enter your preferred settings as described in step 3 below.
-
-
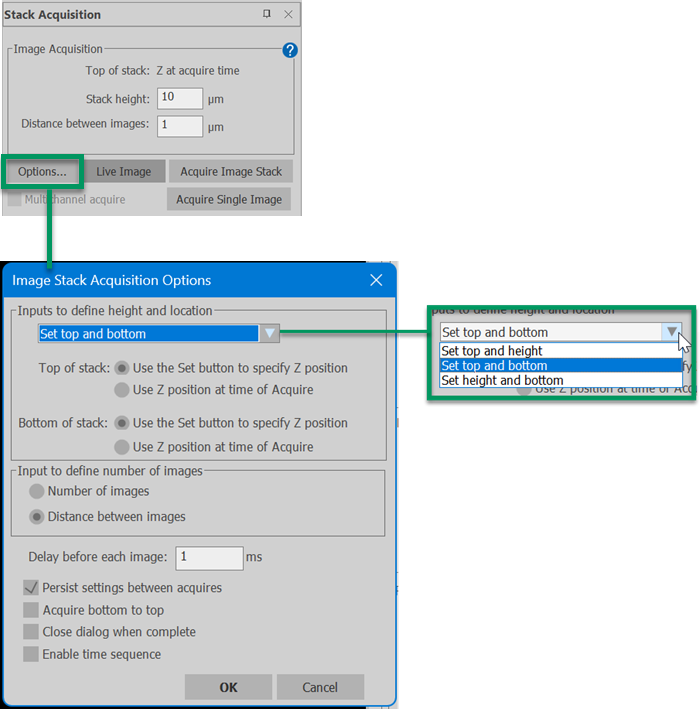
Click Options... to change the choices in the Stack acquisition panel; this opens the Image Stack Acquisition Options dialog.
When options are changed here, they are reflected in the Stack Acquisition panel.
-
Inputs to define height and location:
-
Choose from the drop-down menu how you want to set the top and bottom image planes for the image stack.
-
Top of stack / Bottom of stack: choose how you want to identify the top/bottom of the image stack to acquire:
-
Use the Set button to specify Z position: Set the Z position dynamically
-
Use Z position at time of acquire: Use the current Z position when you click Acquire Image Stack
-
-
-
Input to define number of images: Choose whether to specify the number of image planes you want to capture or the distance between image planes.
-
Other options:
-
Delay before each image: The time allowed for the stage to settle after a Z move. If there is evidence of motion in the images, try increasing the time delay to 200 ms.
-
Persist settings between acquires: the selections will be the default for the user profile until they are changed.
-
Acquire bottom to top: Changes the default image stack acquisition behavior from top to bottom to the opposite when checked.
-
-
Click OK when option changes are complete or Cancel to leave the options unchanged.
-
-
Make sure you are in Live Image mode, with the camera feed showing on screen. Click Live Image in the Stack acquisition panel or
 on the Acquire ribbon.
 -
Input your settings in the Stack acquisition panel.
Note that the choices displayed in the Stack acquisition panel reflect the options selected.
-
Top/Bottom of stack: Z at acquire time—Position the sample top/bottom where you want it for image acquisition.
-
Top/Bottom of stack: <Not Set>—Click Set and move the stage to set the Z position for the top/bottom of the stack as desired.
-
Stack Height: Specify the height in µm for the image stack(s) to acquire.
-
Distance between images: Specify the distance in µm between image planes in the stack. Note that this value must be greater than the z-resolving power of the microscope.
-
Multichannel acquire: Check the box to acquire image stacks from multiple color channels as defined in the Multichannel control panel.
-
-
(optional) Click Acquire single image to test your settings on a single-plane image before collecting the entire stack.
Capture your image stack:
Acquire Image Stack: Click to begin the image stack capture; the following will happen:
-
BrightSLICE displays the image you've just acquired onscreen (Show Images mode).
- The image you just acquired is added to the Image Organizer as an unsaved image.
-