Serial Section Assembler > 3. Finalize section order
3. Finalize section order
Procedure overview

All of the sections that will be used for the brain organ reconstruction are displayed in contact-sheet format, in the order defined in the previous steps. Carefully review and, if necessary, modify the order of sections in this step to prepare for the initial 3D reconstruction.
-
Specify sequential or staggered section ordering.
-
Edit the order of sections and/or placeholders for missing sections to arrange them from top left to bottom right in the order that you want to use for the 3D
-
To move a section or a series of sections, select them, right click and use Cutthen right-click Paste into the new position.
-
You can also Swap the positions of two sections or Reverse the order of selected sections (right click to access these options).
-
Note that any manual reordering you do using these tools will be undone if you change the Section ordering among slides (step 1 above) from sequential to staggered or vice verse.
-
If you notice that a section outline/contour requires reshaping or other edits for use in the reconstruction, right click on the section and choose Go to Slide.
-
You'll revisit the slide with the selected section in the previous workflow step. Edit the section as needed.
- To return to step 3, click Step 3 in the workflow list, click the Next Step button, or click the Done Editing button and right-click and choose Go to Contact sheet.
-
-
-
 When the section order is finalized, click Next Step to continue the workflow.
Tools and commands
Section ordering
In the previous workflow step, the order of sections on each individual slide was defined. In this step, specify the section order between slides.
-
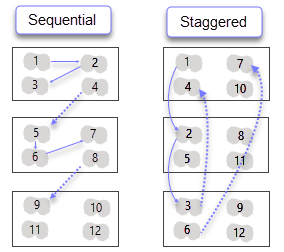
Choose the radio button that best describes how sections are arranged on your set of slides (see drawing):
-
Sequential: Sections are ordered sequentially on the first slide, then on the second slide, and so on. In the example image (right), sequential ordering across 3 slides, with vertical within-slide ordering is shown.
-
Staggered : Sections are sequentially ordered across slides. The example image shows staggered ordering across 3 slides, with vertical ordering on each slide.
-
If each slide has only a single section, choose Sequential.
-
-
Click Apply/Reset if you changed the section ordering in the previous step.
- You will be asked to confirm that you want to apply the new section ordering scheme; doing so will undo any manual re-ordering of sections.
- The order of slides will change to reflect the new section order.
-
Make sure that all sections appear in the correct order for reconstruction. Select sections to be moved or deleted and use the right-click options for the operations described below.
-
Click a section to select it; a white box appears around the section, indicating that it is selected.
Hold down CTRL or Shift and click other sections to select more than one; all selected sections will have a white box around them.
-
Right-click and choose an option:
-
Cut: Cut one or more sections in preparation for pasting them to a different location. The box around the cut sections will become red to indicate that they will be removed from their current location.
- Paste: Position the cursor where you want to insert the cut section(s); a white line between sections indicates possible destinations for pasting. Right-click and choose Paste to insert the section(s).
-
Remove: Deletes the selected section and re-orders the remaining sections.
-
Reverse Order: Reverses the order of multiple selected sections.
-
Swap Sections: Reverses the order of two selected sections.
-
Insert Blank: Insert a blank or placeholder section; this is useful for leaving a gap when sections are missing from the slides.
-
Go to Slide / Go to Contact Sheet: Show the slide that contains the selected section with section numbers and outline/contours displayed. From the slide view, right-click and select Go to Contact Sheet to go back to the contact sheet.
-
Clear Selected: The selected section(s) become unselected.
-
-
Number of sections: The total number of sections currently defined in the workflow is displayed. This can be helpful if you know the total number of sections, including any missing sections, that you want to include in the 3D reconstruction.
Display Columns
(optional) Change the number of columns in which the sections are displayed by typing a different number into the Display Columns box to optimize the display for your monitor.
Section Information
Show section info on contact sheet: Check the box to display slide and section IDs superimposed on sections in the contact sheet.
Hover your mouse over any section and the following information is displayed about the section in the boxes. Note that changing the order of the sections using the controls in this step of the workflow does not affect the section information displayed.
-
Image file: name and file path of the slide-image file
-
Slide Id: slide number from the ordered list in Step 1
-
Section Id: section number from Step 2
Go to 4. Automated section alignment