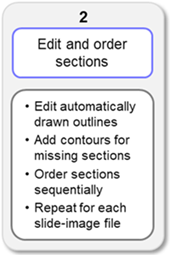
Serial Section Assembler > 2. Edit and order the sections
2. Edit and order the sections
Procedure overview
When the workflow step opens, you'll see the first slide in your series displayed with each section automatically outlined (in red). These outlines/contours define the areas of the image that will be used for the reconstruction.
-
Review the accuracy of the outlines/contours and adjust the detection settings and/or edit the sections as needed.
-
Indicate the order of sections within the slide so that NeuroInfo knows how to reconstruct the
-
Click Next Slide >> and repeat these steps for each slide to review.
-
 When all slides have been reviewed, click Next Step to continue the workflow.
You can return to this step from step 3 if you need to make changes.
Tools and commands
Select slide to review
The number of the current slide and the status of your review is displayed.
 Click Next Slide to move to the subsequent slide.
 Click Previous Slide to go back to the slide before.
Edit section(s)
The number of sections outlined with a contour (and therefore recognized by the software as a serial section from your specimen) is written at the top.
Before you start
-
If needed to see your sections clearly, adjust your images using the Image adjustment .
-
Use the Zoom and Field move tools on the Move ribbon to clearly see the sections and their outlines.
-
You can change the display colors of the outlines/contours if needed using the color pickers near the bottom of the workflow window.
-
 Click Edit Slide or click on any outline/contour to select it and enable editing of section outlines/contours; the button will change to Done Editing while the program is in editing mode.
Recommendations for refining section outlines/contours
-
Click Edit Slide to enter outline/contour editing mode.
-
 To adjust how NeuroInfo detects and outlines the sections, click detection settings and change smoothing and threshold settings. (See details below.)
 -
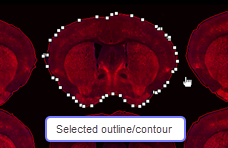
Click on any outline/contour to select it for editing. The selected outline/contour is represented by a series of white points and the cursor changes from a red cross
 to a white hand
  .
.Hold down CTRL or Shift and click other outlines/contours to select more than one.
-
Use the editing buttons and the right-click functions to modify the outlines/contours to correspond to the sections on your slide.
-
Add placeholders for missing sections (i.e., sections that are not on any of the slides that will be used for the reconstruction). Note that you can alternatively add placeholders in the next workflow step.
-
 Click Done Editing when outlines/contours correspond to the sections on the slide.
The order of the sections on the slide will be displayed.
-
If further editing is needed, click in the image to select a contour to enable editing or click Edit Slide. Continue editing and click Done Editing when complete.
Section-editing tips
Adjust the detection settings as a first step: If the automatic detection and outlining of your sections is not satisfactory, first adjust the detection settings to improve detection and outlining, then manually adjust if necessary. Clicking the detection settings button deletes the outlines/contours, including any edits that have been made to them.
Removing extraneous fragments: Tissue section outlines/contours may include tissue fragments that could confound the reconstruction. There are a few ways to remove outlines/contours that correspond to these tissue-sectioning artifacts:
-
 Split the outline/contour, then delete the outline/contour around the tissue fragment. This quick method works well when you can easily see that there is a fragment adjacent to the section.
 -
Move, delete, or insert outline/contour points (see below)
Section-editing buttons
|
|
Split into two separate section outlines/contours.
|

|
Merge two section outlines into a single outline/contour.
Note that if your slide contains a single section, you can click the Single Section radio button under Order section within slide, rather than having to merge multiple times. |

|
Delete the selected outline/contour. Alternatively, you can hit the Delete key on your keyboard or right-click and choose Delete Selected Contour.
|
  |
Add an outline/contour for a section that was not automatically outlined or a missing section.
|
|
|
Check to show boxes that encompass each section. This can be helpful for troubleshooting section detection. If extraneous tissue present on a slide has been included in a section outline/contour, showing the section crop boxes will typically make that more obvious. You can change the display colors of section crop boxes if needed using the color picker near the bottom of the workflow window. |
|
|
Click to delete the section outlines and open the Detection Settings dialog. Note that when you change the settings, they persist for future section detection/outlining operations.
|
|
|
Click Edit Slide or click on any outline/contour to select it and enable editing of section outlines/contours; the button will change to Done Editing while the program is in editing mode. Click Done Editing to exit editing mode. |

Edit outline/contour points
Move, delete, or insert points if needed to accurately outline sections:
- Drag individual points with the mouse.
- To delete a point, hover over the point, right-click and select Delete Point.
- To insert a point:
- Right-click near the selected outline.
- Select Insert Point in Selected Contour from the right-click menu.
- Click the location on the outline where you want to insert the point.
Right-click options
Many functions can be accessed from the right-click menu.
-
Move Selected Contour: Enables dragging the with your mouse. The cursor becomes an open hand—click and hold to grab the contour and drag it to the desired location; release the mouse click to complete the move.
-
Delete Selected Contour: Click to delete the selected contour, effectively removing it from the workflow.
-
Merge Contours: Merges two selected outlines/contours into a single outline/contour.
-
Split Contour: Splits the selected outline/contour into 2 separate outlines/contours.
-
Copy Selected Contour: Click to copy the outline/contour, then right-click again and Paste Objects will be an option.
-
Paste Objects: Paste the previously copied outline/contour. The new copy is positioned directly on top of the original; select it and use Move Selected Contour to properly position the copy.
-
Insert Point in Selected Contour: Click the location on the outline where you want to insert the point.
-
Change contour to color...: Click to open the color picker, then choose the new color and click OK to change the color of the selected outline/contour.
-
Close Selected Contour: Closes an open contour, effectively adding the contour to the workflow.
-
 Undo Last Point: Undo the previous change to a point in the outline/contour.
 -
Invert Selection: Similar to the tool in Photoshop, Invert Selection switches the selection status of outlines/contours; selected contours become unselected and vice versa. It makes it easy to delete automatically detected outlines/contours that do not correspond to sections of your specimen:
- Select the outlines/contours to include in your reconstruction.
- Right-click and choose Invert Selection; extraneous contours are selected and relevant contours are deselected.
- Delete the extraneous contours: using the Delete key on your keyboard, the button, or the Delete Selected Contour right-click option.
Order section(s)
Click a radio button to indicate the order in which the sections are arranged on the slide. Note that you can specify different orders on different slides if needed to reflect how the sections were placed on the slides.
- By Row: order sections in rows
- By Column: order sections in columns
- Single section: the slide contains a single section
Display Colors
You may want to change the color of outlines/contours and/or section crop boxes to make them easier to see. Use the color pickers to set their display colors.
Contour Color: Change the color of the outlines/contours that delineate your sections using the color picker.
Cropbox Color: Change the color of the section crop boxes using the color picker.
About the outlines generated by the Serial Section Assembler workflow
NeuroInfo detects connected regions bounded by strong edges; these regions are interpreted as individual sections and are then automatically outlined. Where two sections overlap, NeuroInfo identifies “pinch points” to split the outline into two separate outlines.