Macro view
Purpose

|
The Macro View window provides an aerial view of all markers that were placed (with or without images). The view is a top-down perspective along the X and Y axes (as in the main window). Open it by clicking Macro View on the Workspace ribbon or in Step 2. XY Settings of the Tissue Scan workflow. |
Navigating using Macro View
Quickly move to a specific part of the image outside of the current field of view:
- If you are displaying a live image from the camera: click
 Go To in the Macro View window, then, also in the Macro View window, click the location you want to view; the stage will automatically move to the area you clicked and it will be visible in the main window.
 - If you are displaying an image that you have already acquired, there's no need to click Go To. Just click an area in the Macro View window to display it in the main window.
Macro View options
To use the options, click the icons in the Macro View window; most are also available by right-clicking in the Macro View window.

|
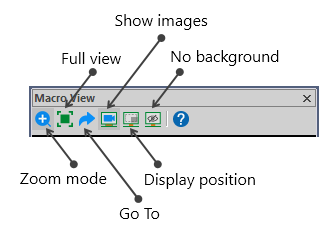
Zoom mode: Draw a marquee around an area of interest in Macro View to zoom in on it. This does not affect the image displayed in the main window. |

|
Full view: Displays the entire image in the Macro View window. |

|
Go To: |

|
Show images: Image(s) are displayed along with any markers. |

|
Display position: Displays the markers overlaid on a gray background in the position that they appear within the image. |

|
No background: Displays markers only over a clear background. |