Placing markers
Purpose
Use markers to quickly mark structures of interest in your
Using Markers
Showing and hiding the Markers toolbar
By default, the Markers toolbar runs vertically along the left side of the main BrightSLICE window.
Right-click in the status bar at the bottom of the main BrightSLICE window and check or uncheck Markers toolbar to show or hide the toolbar.
To show or hide the Markers toolbar do one of the following:
Placing markers
-
Click a symbol in the Markers toolbar to select the marker type.
-
Click in the tracing window to place the marker.
-
Continue clicking to place additional markers of the selected marker type.
-
To switch to a different marker, select its symbol in the Markers toolbar and click in the main window to place it.
-
- Exit Markers mode by clicking the highlighted marker type in the Markers toolbar.
Deleting markers
To delete the last marker placed, press Ctrl+Z on the keyboard.
To delete one or more markers, select the marker(s) and press Delete on the keyboard.
To delete all markers of the same marker type, right-click over the marker type in the Markers toolbar and select Delete All Markers of This Type.
Editing markers
There are comprehensive marker-editing options in the main window; see Editing markers (2D).
Changing marker properties
Go to File > Preferences >
BrightSLICE software applies the change to all markers associated with that symbol, including markers that have already been placed.
Customizing the markers toolbar
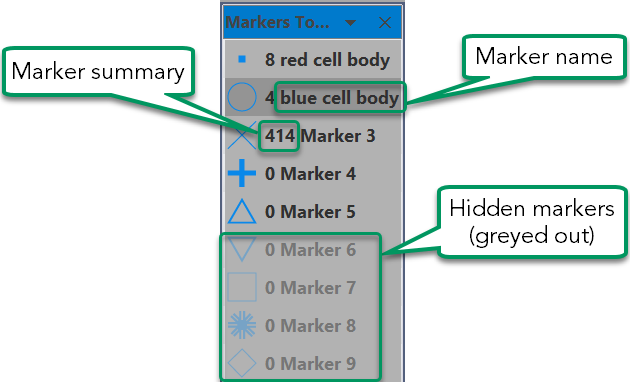
Displaying marker summary and marker names in the Markers toolbar
|
|
|
Adding or removing marker types
This can be of interest if you want to declutter the Markers toolbar
Right-click over the Markers toolbar and select Customize Marker Bar.
-
Select markers in the Customize Toolbar window and use the and buttons to specify the marker types available in the Markers toolbar.
-
Click to return the Markers toolbar to include the default list of markers.
Hiding a marker type
Right-click a marker in the toolbar and select Hide Marker; the marker becomes unavailable in the toolbar and markers of that type that have already been placed are hidden.
See Hidden Objects for information on hiding and revealing objects.
Repositioning the Markers toolbar
To move the Markers toolbar, hover your mouse on the top of the toolbar; the cursor will become a 4-pointed arrow. Drag the toolbar to move it.
- Drag the toolbar to any edge of the tracing window to dock it.
- Position the toolbar anywhere onscreen as a floating toolbar.
See also Setting up dockable windows