Create Subvolumes in 3D
Purpose

|
The Subvolume tool enables you to specify subvolumes (regions of interest) and load image data only from those regions. |
See also Image Slice display options.
Procedure
- Open an image file and view it in the 3D Visualization window.
 If the 3D Visualization window is not open, click 3D Visualize in the Workspace ribbon to open it.
 - Create a subvolume:
-
 Click Subvolume.
 - Move and resize the box as needed:
- Click in the image to move the box to the cursor location (the clicked point will be the center of the box) OR drag the box with your mouse to reposition it.
- Drag the spheres to resize the subvolume OR hold the Shift key on the keyboard and roll your mouse wheel to resize in all dimensions proportionally (see details below).
- Drag your cursor to rotate the image in 3D and view the subvolume from different angles. Resize the subvolume as needed to include the desired regions of the image volume.
- Click to load image data and display the region of interest you just defined.
-
(optional) Click and enter a name in the dialog box that appears. Saved subvolumes are listed in the Saved Locations table.
Saved locations (subvolumes) are retained only for the current session; they are not saved with the data file.
-
(optional) Click to crop the portion of the image within the subvolume and save it as a separate image. In the Save Image window, browse to a folder to save the image in, and use the slider to choose the compression ratio.
- Click to exit the current subvolume. The semitransparent box with spheres will be displayed again.
- Move and resize the box to define additional subvolumes as needed.
A semitransparent box, with spheres as control-handles for X, Y, and Z dimensions, will appear on the 3D image. It represents the subvolume. 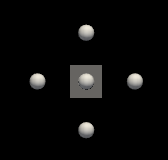
Commands and Functions
Subvolume button
 Click Subvolume to divide your image volume into subvolumes.
-
Move the box to the desired region of the image volume one of the following ways:
-
Drag the box to the desired location.
-
Click where you want to place the box; the clicked point becomes the center of the subvolume.
-
Resize the box to fit the region of interest one of the following ways:
- Drag any of the spheres. The sphere will turn green when selected; if it doesn't turn green, you need to rotate the image to make it possible to select and move the sphere.
- Hold the Shift key on the keyboard and roll your mouse wheel to resize in all dimensions proportionally.
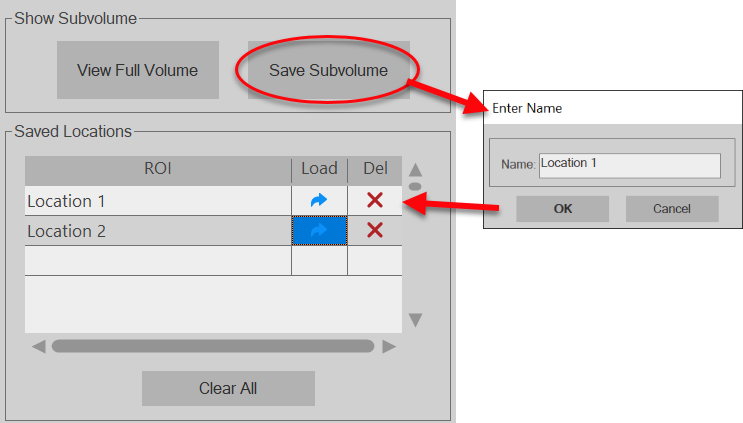
Show Subvolume
/ Toggles between loading image data for the subvolume or the entire image.
Click to name and save the current subvolume. Note that saved locations (subvolumes) are retained only for the current session; they are not saved with the data file.
Click to crop the portion of the image within the subvolume and save it as a separate image.
Saved Locations
The table shows subvolumes saved in the current BrightSLICE software session.
Saved locations (subvolumes) are retained only for the current session; they are not saved with the data file.
- Click a table row and the corresponding subvolumes is displayed on the image.
- Double-click the name of a subvolume to change its name.
-
 Load: Click to load the selected subvolume.
 -
 Delete: Click to delete the selected subvolume. (Note this action cannot be undone.)
 - Clears all saved locations. (Note this action cannot be undone.)