Aligning the light sheet
Overview
Align the light sheet each day before using the BrightSLICE system in your research.
We recommend aligning the light sheet as part of your daily power-on routine for the BrightSLICE system. The process aligns all optical components of the system so that:
-
The light sheet is centered in the microscope / camera field of view
Light from left and right illumination arms form a light sheet that is perpendicular to and centered in the microscope / camera field of view
- Microscope objective is focused at the same plane (z location) as the light sheet
Before you start
-
Place the calibration slide in the BrightSLICE system. (See instructions for loading specimens.)
Light sheet alignment procedure
-
Load the calibration slide.
-
Place the calibration slide in the BrightSLICE system. (See instructions for loading specimens.)
-
In the Imaging Mode window, select Widefield as the Illumination Mode.
-
-
Position the calibration slide on an area outside of the bead wells using the stage-controller joystick, so that an evenly illuminated area of the slide appears in the main BrightSLICE window.
This procedure uses the fluorescent slide coating, not the sample wells.
Avoid areas of the slide that show bubbles, debris, or scratches.
-
Verify that the fluorescence signal is visible as a narrow vertical line in the main BrightSLICE software window (see image, right). The light sheet can be automatically calibrated as long as a vertical line is visible anywhere in the window.
-
Enable the left and right laser arms by clicking them in the BrightSLICE Laser window. The status indicator will turn green.
-
Set the emission levels of the laser wavelengths to be aligned to 100% using the sliders in the Laser control section of the window.
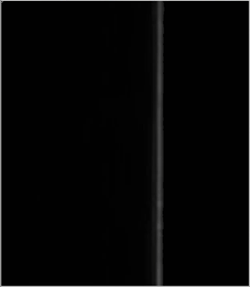
Alignment slide appearance -
In the Imaging Mode window, adjust the Exposure to .
If a vertical line is not visible, adjust the following in the Light Sheet Settings window:
 No line is visible: (click to expand)
- Click the Left and/or Right button for each illumination arm in the Move position and focus section of the Light Sheet Settings window.
- If a line is not visible after clicking both the buttons, try adjusting the light sheet position by changing the values in the Image Left and Image Right boxes.
The line is dim and/or hard to see:
- Increase the Exposure for widefield illumination mode using the slider in the Imaging Mode window.
- Check that the emission levels for the lasers are at 100%. If not, adjust using the sliders in the Laser control section of the BrightSLICE Laser window.
The line is wide and diffuse:Adjust the Focus in the Light Sheet Settings window.
The line is not verticalIf the line is not vertical (e.g., it is diagonal across the field of view), your BrightSLICE system may need a hardware adjustment. Contact MBF Bioscience Technical Services, https://www.mbfbioscience.com/welcome-technical-services for assistance.
-
-
Start the light-sheet alignment process:
-
Click the Align button in the Light Sheet Settings window.
-
Select options in the Auto-align position and focus dialog box that opens:
-
Arms to align: Check the check boxes to indicate which laser arm(s) you want to align.
-
Alignment options: Choose from the following alignment-process options; they are listed in order from the most to least extensive.
-
Auto-alignment with full initialization: Each step in the auto-alignment process is conducted, BrightSLICE software considers a wide range of settings to identify the best possible alignment of the system's optical components.
Select this option if you have made hardware changes or adjustments, or if you are concerned that alignment of optical-system components requires adjustment.
-
Auto-alignment: Slightly faster than the previous choice because some settings from the previous successful alignment are used.
This option is a good choice for daily system-alignment when everything is working as expected.
-
Center Only: Just the last two steps of the auto-alignment are conducted; the other settings are from the previous successful alignment. This is the most rapid auto-alignment choice.
-
Manual: View and adjust settings for each illumination arm and color channel manually.
In most cases, both laser arms should be aligned; they work together to optimally illuminate specimens for high-quality data acquisition.
-
-
Click the OK button to begin the alignment process.
If you selected the Manual alignment option, see instructions for manually aligning the light sheet.
If you selected any of the automatic options (Auto-alignment with full initialization, Auto-alignment, or Center only) the BrightSLICE Autoconfiguration window opens and displays the progress of the alignment.
-
The table at the top of the window indicates the laser arm / color channel pair being aligned.
-
The bottom table shows an overview of the auto-alignment steps.
-
After each step of the auto-alignment is completed, the viewing window displays the result of the light sheet adjustment.
-
-
-
(optional) Manually adjust light-sheet alignment for each laser arm / color channel pair.
Note: this step applies only to the three auto-alignment options.
Just before completion of auto-alignment for each laser arm / color channel pair, BrightSLICE software pauses for several seconds to provide an opportunity adjust the position and focus before saving.
The Adjustments window opens and asks if you would like to adjust settings; .
-
Do nothing or click No and the auto-alignment will continue without any input from you.
-
Click Yes and a window titled Adjust Before Saving opens. You can adjust Position and Focus light-sheet settings for the current laser arm / color channel pair . Click OK when the adjustments are complete or click cancel to exit without making changes.
-
-
Click OK to acknowledge that the alignment is complete.
A dialog box opens to let you know when the light-sheet alignment is complete; click OK to close the box and exit the alignment process.