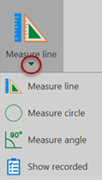
Measure line/circle/angle
Purpose
|
|
About the measurement tools
-
 To view, print, or copy measurements to the clipboard, click Show recorded; this opens the Quick Measurements window where measurements are recorded.
 -
To exit the measurement tools do one of the following:
-
Click the tool icon to deselect it.
-
Right-click and select Stop Quick Measurements.
-
Initiate another action (e.g., Go To or Move Image).
-
Press the Esc on the keyboard.
-
-
By default, the measurement tools operate in Continuous mode—once you click a measurement tool icon, it remains active until you exit the tool as described in the previous bullets. In Continuous mode, you can quickly take multiple measurements successively.
-
To exit Continuous mode right-click and de-select Continuous. With Continuous mode de-activated, you'll need to click the measurement tool icon each time you want to take/record a measurement.
Measure using lines
Tips for the measure line tool:
-
To adjust your origin point, press the Shift key and drag the line.
-
To constrain the line to 22½° increments, press the Ctrl key. This is helpful for drawing perfectly horizontal and vertical lines.
Taking a single measurement
-
Click one end of the line, move your cursor and click again to indicate the other end of the line.
-
The measurement is displayed and recorded.
-
Click to take another measurement.
Taking multiple measurements from a single point
-
Click the point of origin.
-
Position the cursor over the first end point and press F8 on your keyboard to record a measurement. The "rubber line" remains anchored at the point of origin.
-
Position the cursor at the end of another line and press F8 to record the new length. Repeat as many times as desired.
Each value is recorded; click Show recorded to view. -
To complete, press the Esc key or click (rather than pressing F8) to indicate the end of a line.
To measure distances across multiple fields of view
-
Click the point of origin.
-
 Use the
Measure using circles
-
 Click Measure circle.
 - Click the center of the circle.
- Drag the mouse to draw the circle and click again to indicate the extent of the circle.
- Click to view and record measurements, including radius, diameter, circumference, area, and volume.
Measure angles
This tool measures an angle defined by three points.
-
 Click Measure angle.
 - Click and drag the mouse to draw the first line of the angle.
- Click again to indicate the vertex of the angle.
- Drag the mouse to draw the second line and click again to end. The angle is displayed in degrees and radians.
Display measurements
Measurements are recorded for the duration of the session; they are not saved to the data file.
-
To view the recorded measurements, click Show recorded. The Quick Measurements window opens and displays measurements in the order in which they were made.
- You can reposition or dock the Quick Measurements window if desired.
- To add notes about a measurement, highlight an entry and type into the Notes: box.
-
To view details about a measurement, double-click the entry.
-
Use the buttons at the bottom of the window to:
-
: Remove the selected data from the list
-
: Copies selected data to the clipboard so that you can paste it into a different application.
-
: Remove all data from the Quick Measurements window
-
: Close the Quick Measurements window
-
: Print the Quick Measurements window
-