Identifying anatomical structures
Atlas ontology tools purpose

|
While in Register Sections or Register Volume mode, click the tab for Atlas ontology tools to access the complete ontology list for the atlas to which your image(s) were registered (aligned) . |
Once you have registered (aligned) all or part of your experimental brain to a reference-brain atlas, using the Section Registration or Volume Registration tools, open the Atlas ontology tab to access tools for viewing and modeling the anatomical structures and regions that are defined in the brain atlas used for the registration. You can also create and edit groups of anatomical structures and regions that are pertinent for your research.
Procedures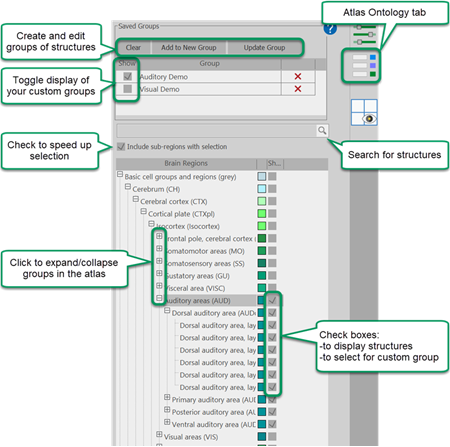
About the anatomical structures list
Brain atlases include a long list of anatomical structures grouped into larger brain structures.
-
To find a structure in the list, use the Search bar.
-
Click the plus/minus symbols to expand or collapse the groupings.
-
The check boxes next to structures and saved groups have two functions:
-
Toggle display of the structure or group on and off
-
Select the structure or group for group creation or updating
-
-
Check Include sub-regions with selection to automatically select all sub-regions when a main region is selected. The main region does not need to be expanded for the sub-regions to be automatically selected.
-
 Click Clear to uncheck all boxes quickly.
 -
The colored boxes to the right of each structure or structure group indicates the color of the contour (outline) used to represent the structures location in the brain.
Display anatomical structures
-
See the name of the anatomical structure at the cursor location: Hover your mouse over the Experimental or Atlas Slice images (top and bottom images on the right) to display the name of the brain structure in the lower left corner of the image panel.
-
Display the outline of the anatomical feature:
-
Ctrl + click the location with your mouse
-
 Click Select Anatomy in the Registration ribbon and click the location with your mouse.
  Click Deselect Anatomy to turn off display of anatomical structures.
 -
Click the check box for the structure name in the list displayed on the Atlas Ontology tab to display its outline. Uncheck the box to stop its display.
-
-
Display Saved groups of brain structures: Check the box for the saved group to display the structures. Clear the box to stop displaying the saved group of structures.
Create groups of structures
 Create a new group:
-
Check the boxes next to the brain regions to include in your group and click Add to New Group.
-
Type a name for the group of structures in the Enter Anatomic Region Group Name dialog box and click OK.
Your new group will appear in the Saved Groups table and the brain structures in the group will be displayed.
 Update an existing group:
-
Check the box for the Saved Group you want to update.
-
Check the boxes next to the brain regions to add to your group and click Update Group.
The brain structures in the updated group will be displayed/ not displayed when you click the box for the Saved Group.