Atlas calibration
Purpose
Use the Atlas calibration function to either:
- Calibrate an atlas so that you can match experimental sections with reference sections. Calibration is performed once with one experimental section; it is then applied to the other sections from the same specimen.
- Load existing calibration parameters.
Procedure
- Open your image by dragging and dropping the file onto the NeuroInfo software window, clicking the Open an image file button in the Quick Access bar (Ctrl+O), or using File > Open > Image.
-
 Click the Atlas calibration button on the Registration ribbon to open the Calibration window.
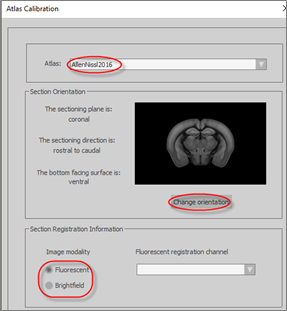
 - In the Atlas Calibration window

- Enter a name and click Create new. New options are displayed.
- Select an atlas (we provide Allen atlases by default but you can add your own).
- Optional - Define the orientation of your experimental section: Click Change orientation.
- Select the experimental image modality.
For fluorescence:
- Select the channel to be used for registration from the drop-down menu.
- Go to the Image adjustment panel (Workspace>Adjustment) and select the registration channel to display that channel only in the experimental section.
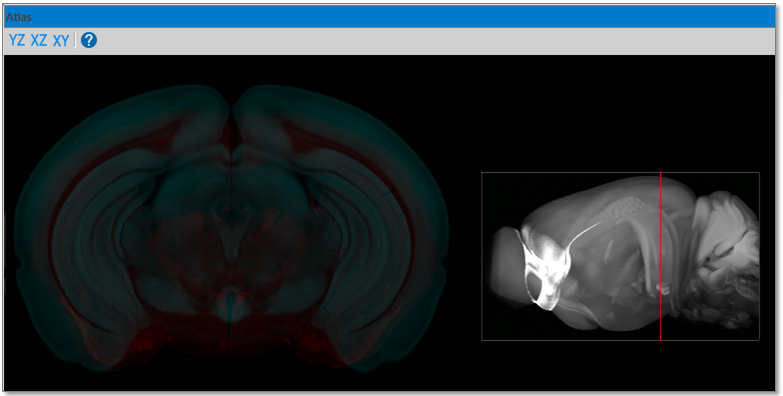
- Click Next. The Atlas Calibration window changes to display more settings, and the Atlas window opens, showing a 2D reference section on the left and the 3D reference brain volume on the right.
- Match reference and experimental sections as closely as possible using the Atlas window and the Atlas calibration settings.
- To help with visualizing the two sections, try Show tissue overlay , Use color [...] or adjust black point, white point, and transparency with the sliders. For transparency, the closer to Section, the more visible the experimental section; the closer to Atlas, the more transparent the experimental section. In our example, the reference section is a blue overlay and the experimental section is red.

- Navigate in Z to find the closest matching reference section: use the Z slider (drag the slider or scroll the mouse wheel to move along the slider).
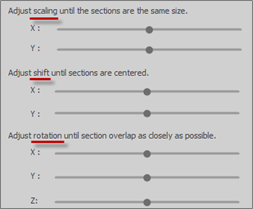
- Adjust the scaling (scaling slider) and orientation (shift and rotation sliders) of the reference section so that it matches the experimental section as closely as possible.

- Adjust scaling to match size: Stretches and shrinks the reference section in the XY axis to fit your section.
- Adjust shift to center the reference section over your section: X shifts the reference section along the X axis (left and right); Y shifts the reference section along the Y axis (up and down).
- Click automatically refine the manual adjustments[...] to finish the calibration.
- To help with visualizing the two sections, try Show tissue overlay , Use color [...] or adjust black point, white point, and transparency with the sliders. For transparency, the closer to Section, the more visible the experimental section; the closer to Atlas, the more transparent the experimental section. In our example, the reference section is a blue overlay and the experimental section is red.
- Click Save to save your calibration parameters.
Also learn about...
Copy and paste your atlas files into the ..\ProgramData\MBF Bioscience\Atlases directory.
Define sectioning plane, sectioning direction, and image orientation.
By default, the middle reference section is displayed on the left:
- As you move your mouse over different areas of the section, you can see the name of the anatomical structure at the cursor location.
- To zoom in, place the mouse over the section and scroll the mouse wheel.
The reference brain is displayed in 3D on the right; you can rotate it by dragging the mouse.
- The red line indicates the plane location of the reference section shown on the left.
- The yellow sphere indicates the location of the anatomical structure you're pointing to in 2D.