Create sets of modeled structures
Purpose

|
Use Create Sets to group modeled and/or traced structures into sets for later analysis in This feature is often used to group traced neuronal structures that comprise a neuronal cell. It can, however, be used to create sets for other purposes. |
The quickest way to create sets is to use the Create Sets tool in the 3D Environment; alternatively you can create sets in the 2D window.
See also Create Sets panel (3D)
Creating sets in the 3D Environment
Before you start
- Trace or detect the structures that you want to place into sets.
-
In the 3D Environment, click the Sets button to display the Create sets panel.
Create sets manually by selecting structures
- Select the structures you want to group into a set (e.g., neuron or glial cell): Hold down the CTRL key and draw a marquee around the structures OR hold down the CTRL key and click each structure.
- Click Place selected into set.
- Enter a name for the set. The set is added to a list of Created sets.
- Repeat as needed to create more sets.
Create sets (cells) automatically
You can also generate multiple sets automatically, based on the distance entered into the Maximum distance (µm) field.
- Select structures to include in your sets in the Item types section of the panel; Hold down the CTRL key and draw a marquee around the structures OR hold down the CTRL key and click each structure. This option is available for somas and other neuronal structures.
- Set your desired Maximum distance, which is the distance between tree endings and soma surface.
- Click the button, Place Selected Into Multiple Cells.
- In the Names of Sets window that opens, enter a prefix that will be used to identify the sets created and click OK.
- The sets created will appear in the list of Created sets, with names that start with the prefix you specified.
Working with Created sets
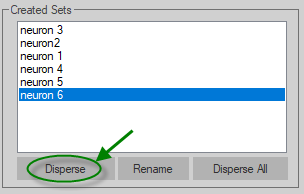
When sets have been created, they are listed near the bottom of the panel.
You can delete or rename sets with the buttons, note that these controls affect only the sets that have been created; they do not affect the traced structures:
-
Disperse: Click to delete the selected set.
-
Disperse All: Click to delete all sets
-
Rename: Click to change the name of the selected set.
 Click the Neurolucida Explorer button in the toolbar to save your data file and launch Neurolucida Explorer. In Neurolucida Explorer, note the sets listed in the Traced structures panel.
Creating sets in the 2D window
Alternatively, you can use the editing mode in the 2D window to create sets from traced structures.
Grouping objects into a set
-
Select objects to include in the set from the Trace ribbon in the 2D window, Edit section:
-
 Click Select objects, and select all the objects to be added to a group. Press the SHIFT key and click the objects OR drag your mouse to select objects within the marquee.
 - To add or remove objects from a group of selected objects, hold down CTRL and click an object.
-
Right-click and select Place into set.
In the Name of Set window, type a unique name for the set and click OK.
Viewing and editing the set
-
Click Select objects and make sure that no object is selected.
- Right-click in the tracing window and choose Select by set.