Editing vessels (3D)
Purpose
 Use the Edit Trees panel in the 3D Environment to change trees that have already been modeled.
See also Edit Trees Panel (3D)
Before you start
-
In the 3D Environment, click the Edit button to display the Edit Vessels panel. More editing options are available after selecting vessels or clicking the Points button.
-
If vessels are associated with a single color-channel (that is, if a color channel was selected prior to tracing or detecting the vessels), select that color channel to access all of the vessel-editing functions. Select the color channel in either the Channel panel in the 3D environment or in the Image Adjustment tool in the 2D window.
-
When editing, vessels can be visualized as continuous lines or as series of points.
-
Use this panel to set directionality of vessel flow.
If you're working with very dense networks, use the partial projection view (select this option from the  Image panel).
It is likely that you will need to adjust the image zoom/position for some of these operations:
• Zoom in/out by scrolling the mouse wheel.
• Pan to position the image by pressing shift and dragging with your mouse.
Selecting vessels and vessel segments
- To select a single vessel or vessel segment, click it with your mouse.
- To select all vessels, click Select All.
- To select several adjacent segments, press the CTRL key and draw a marquee (rectangle) around the segments of interest.
- To deselect all vessels, click away from the selected objects. CTRL-click to deselect individual segments while leaving the rest selected.
 Selecting points on vessels
- To select a single point on a vessel, click the Points button then click the point of interest.
- To select multiple adjacent points, press the CTRL key and draw a marquee (rectangle) around the points of interest.
Once multiple points are selected, clicking a single point in your selection has no effect and will NOT deselect that point.
- To deselect all points, click away from the selected objects. CTRL-click to deselect individual points while keeping the rest selected.
- Click the Points button again to exit points-editing.
Showing/hiding vessels
Click Hide selection to hide all selected vessels.
The button will change to Show selection; click it to show hidden vessels that are still selected.
To show hidden vessels, click Show all hidden.
Editing vessels and vessel segments
 Splitting/detaching a segment
- Click a vessel to select it.
-
Click the Detach button.
- Click on the segment to detach.
- If you click a single segment, it is split into two segments.
- If you click a bifurcation, the segment is split into three segments.
 Connecting/splicing segment
- Zoom in and rotate as needed.
-
Click the Connect button. Vessels are now represented by series of points along colored lines.
- Click and drag an end point toward the area you want to connect to. The end point briefly turns green and a green line appears.
- Release the mouse button to connect the segments.
Editing using the points on the vessel
Select points in order to edit them (see Selecting points on vessels above)
Moving points
- Zoom in and rotate as needed.
-
Click the Points button. Segments are now represented by series of points along colored lines.
- Select the point(s) you want to move. Selected points are displayed in green.
- Drag the point(s) to the desired location.
Deleting points
- Zoom in and rotate as needed.
-
Click the Points button.
- Select the point(s) you want to delete.
- Press Delete or click the Remove button.

Changing point thickness
- Zoom in and rotate as needed.
-
Click the Points button.
- Select the point(s) for which you want to adjust the thickness.
- In the Edit Vessels panel, drag the slider under Thickness Adjustment.
- Click a vessel to select it or click the Select All button.
- Click the arrow near the colored square to access the Color picker, and choose a different color for the selected vessels.
 Identifying and removing fragments with the cleanup tool
After tracing complex structures
-
To view a list of issues, click the CLEANUP button.
Fix column:
-
 Indicates that the fragment can be deleted automatically.
 -
 Indicates that manual editing is recommended (e.g., merging).
-
-
To delete all the fragments that can be automatically deleted (in the list), click the CLEAN ALL button.
-
To inspect a specific issue, click the description of the issue; the corresponding area in the tracing gains focus in the display.
-
To resolve a specific issue, click
in the FIX column.
- No branch points: The vessel doesn't include any node or branch point: Edit manually to fix this issue.
- Vessel fragment found: The vessel has two or less points: clicking Fix will delete the vessel.
- Ending not at image boundary: The ending point is not at the image boundary: Edit manually to fix this issue.
 Classifying segments
Use classify to categorize segments for later analysis in Vesselucida Explorer.
-
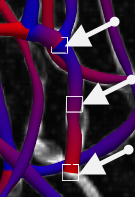
Click to select a segment; a selected segment is indicated by three white squares (beginning, middle, and end of segment).
Use CTRL-click to select several segments.
-
Select a name from the Segment Name drop-down menu to classify the selected segments.
To customize the names in the list, click the Color sets button, highlight a name and type a new name.
-
When you save, then open, the data file in Vesselucida Explorer, the classified structures are listed in the Networks tab of the Traced Structures panel.
 Visualizing flow direction with direction
-
Change direction: Click to change the direction of the segment; direction can be changed for individual segments, but not for entire vessels.
To reverse the direction of a segment, click a segment to select it, then click Change direction. When a segment is selected, you can see three squares (beginning, middle and end of segment). As a result, the segment is recolored and the beginning point is now red.

You can only change the direction of a segment that has one open endpoint and is connected to another segment.
-
Set/Clear origin: You can define origins for segments that have one open end and are connected to other segments. \
-
Click a segment to select it then click the Set origin button. This will update the flow direction and set the origin to the open endpoint.
-
Clear origin: Click to undo SET origin. Note, however, that the direction of the flow is NOT automatically reverted. Use the Change flow direction button if needed to change the flow direction.
-
 Deleting vessels
- Click a vessel to select it or click the Select All button.
-
Press the Delete key or click the Remove button. You can’t undo this action!
Editing vessels (2D) in 2D