ApoTome: Acquire a stack and create a projection image
Follow this procedure to acquire an image stack and create a projection image with the ApoTome:
- Open these tools: Image Organizer, Image Adjustment, Camera settings, Multichannel control, Camera histogram, Stack Acquisition, optional: Apotome.
- In the multichannel control window, click Setup.
- Under the Multichannel Acquires tab, check the channels to acquire. Verify that the device command sequences listed match the current objective (e.g., use the 20x GFP Apotome sequence for the 20x objective only). You can save and load presets (e.g., “RGB Widefield” or “40x Only GFP Apotome”) in this window.
- The device command sequences that correspond to your channels are now displayed in the Multichannel control window. Check Remember Video Settings to save exposure time, gain, and other settings separately for each channel.
- Select the first channel and adjust exposure time and gain until the histogram displays the most dynamic range possible.
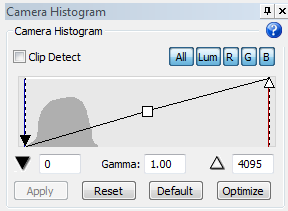
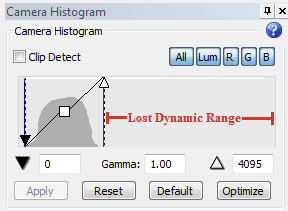
 More about the dynamic range
- The dynamic range in this histogram
 is greater than the one here
- Because the Apotome uses the ENTIRE dynamic range of the histogram, adjusting the black/white point sliders has no effect on the final resulting image.
Example: In a widefield image with this corresponding histogram
, you might be tempted to move the white point slider like this  : This gives the illusion of a better image and is typically an effective method (e.g., live image and non-ApoTome imaging). But it is ineffective with the ApoTome.
 - If the dynamic range is not sufficient when acquiring an ApoTome image, the image will be grainy. Again, if you simply adjust the white point slider to improve the appearance of the live image, the result is likely to be a grainy image.
- The gain option boosts both signal and noise in the image and adjustments to the black and white point sliders limit the dynamic range.
- If there is saturation anywhere in your image (enable clip detect and look for red pixels), there is no way to recover that information once the image has been acquired. This may be fine if you are interested in something faint and don’t care about the saturated objects in the image.
- One possible approach is to increase the exposure time to 250 ms (this is a low enough exposure time to still be able to focus easily), then increase the gain and exposure alternately. The black and white points aren't adjusted until the exposure time is around 800-1000 ms. If the focus needs adjusting and the exposure time is high, you may try to use the DAPI channel since this channel usually has lower exposure times. But these suggestions might not be effective for your situation; don't hesitate to try other approaches until you find what works best for you.
- The dynamic range in this histogram
- Repeat this process for each channel. Once you have finished, verify that each channel's display is satisfactory.
- In the Stack Acquisition window, click Acquire Single Image.
- Verify that this image looks good. If it doesn’t, use the Image Adjustment window to examine the image one channel at a time and determine the problem.
- Once the image is satisfactory, click Live Image, define your image stack options (Top, Bottom, Z spacing) and click Acquire Image Stack.
- After acquiring the image stack, move up and down through the stack using the PageUp/PageDown keys or use the 3D Visualization tool to examine the stack.
Verify that the only image checked in the Image Organizer is the stack you want to examine.
- To save the stack, click its name in the Image Organizer to select it (it is then highlighted in blue). Select File>Save>Image Stack.
- To view a projection image, select with Image>View>Max projection (Control+M). To save the projection image, select File>Save>Image Stack Max Projection.
Alternately, use Image>View>Deep Focus, a tool similar to maximum projection (it identifies high contrast areas within the stack instead of using the maximum intensity values). This creates a separate image in the Image organizer. To save it, select the image name in the Organizer then select File>Save>Image.

About file formats
There are two types of formats: lossless, and lossy.
- Lossless formats (MBF TIFF, TIFF, BMP, PNG) have no visible compression artifacts, and are suitable for publication quality images.
- Lossy formats (MBF JPEG2000, JPEG2000) are suitable for most image processing or analysis. Plug-ins are available to open JPEG2000 images in most third-party applications (e.g., Photoshop).
- If you are planning to use these images in MBF software, the MBF JPEG2000 format is recommended. This format contains metadata (such as scaling information), and renders much more quickly than third-party formats in MBF software.
- The TIFF format is suitable for use in most third-party applications, but it is limited to three channels.