Using individual color channels in 3D
Purpose
In multi-channel images, selecting a single color channel using the Channel panel in the 3D Visualization window displays the selected channel
You may find this useful for
- Differentiating co-localized structures based on color-channel specific labeling
- Reducing the visual complexity of images
- Segregating structures by label
Single-color images have a single color-channel
Procedure
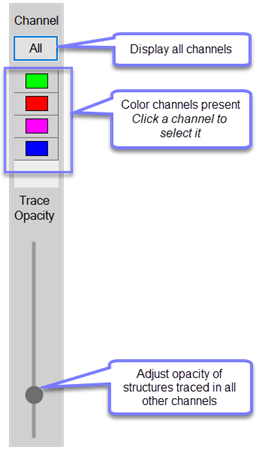
The Channel panel occupies the left side of the 3D Visualization window. When you open an image/image stack, the color channels present in the image are represented as color squares. You can select a channel to view by clicking its square. This is equivalent to selecting a channel to Display in the Image Adjustment panel (accessible from the Image and Workspace ribbons).
Channel panel functions
Channel controls in the 3D Visualization window enable you to view all color channels in your image or quickly select/deselect individual color channels for display.
- All: Show all color channels present in the image.
- Color buttons:
- Click any color button to display that channel
- To change the color-channel, click to select a different one.
- If more than one color channel or All channels are selected (this can be done in the Image Adjustment window, but not in the Channel panel in the 3D Visualization window), structures traced are not assigned to a channel.
Trace Opacity slider:
- Controls the visibility of structures traced in other channels.
- Does not affect the appearance of structures traced in the currently selected channel.