Tracing trees in automatic mode
There are two ways to implement automatic tracing:
- To use the default settings, click the Trace button.
- For a more accurate or faster tracing, adjust the settings first (see description below), then click the Trace button.
To continue incomplete automatic tracings, you can use the user-guided tracing mode.
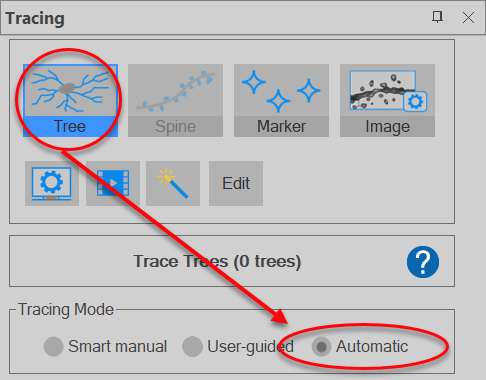
- Click the Tracing button in the Tracing section of the ribbon to open the Tracing panel.

- In the Tracing panel on the right, click the Tree button to display the Trace Trees panel and select Automatic


Tracing trees with adjusted settings
- Select a tracing method.
The three tracing methods are based on algorithms that work by tracing along the dendrites/axons one point at a time, and by producing three measurements at each point: (X,Y,Z) coordinate, thickness, estimated position of the next point.
 Directional Kernels
With this method, four directional kernels are matched to the image data. For a given point within the dendrite/axon, the algorithm identifies the best positions and orientations for the top, bottom, left, and right kernels surrounding the point. The positions and orientations results are combined to estimate the next point to trace. Points are estimated until a set of stopping criteria is met.
The same algorithm is used in the MBF Bioscience AutoNeuron extension module for Neurolucida. For details on the algorithm, see Rapid automated three-dimensional tracing of neurons from confocal image stacks (Al-Kofahi, Lasek, Szarowski, Pace, Nagy, Turner, and Roysam, 2002).
Rayburst CrawlThe detection is implemented from a branch centerline to its outer edges (manuscript in preparation).
Voxel ScoopingThis algorithm generates clusters of voxels iteratively along the dendrite/axon. These clusters are then used to position the nodes that define the centerline of the dendrite/axon.
The same algorithm is used in NeuronStudio software (developed by the Icahn School of Medicine at Mount Sinai). For details on the algorithm, see Three-Dimensional Neuron Tracing by Voxel Scooping (Rodriguez, Ehlenberger, Hof, & Wearne, 2009).
- Click the Show settings button.
- In the Display Seeds tab, click the Display Seeds button.
- To change the seed color, use the color picker next to the Hide Seeds button.
- To adjust the number of seeds, use the sensitivity slider and the density buttons.
- Click the Refine Seeds tab.
- Click the validate Seeds button. The program applies an algorithm to evaluate seed placement.
- To decrease the number of unwanted seeds, increase the Refine filter value .
- Add or remove seeds manually.
- To change the color of manually added seeds, use the color picker.
- To add a seed, click in the image.
- Select the Remove seeds within circular cursorradio button.
- If needed, change the size of the cursor to by holding the Ctrl key and scrolling the mouse wheel.
- Click in the image to remove seeds within the cursor radius OR hold down CTRL and drag to remove contiguous seeds.
Adding seedsRemoving seeds - Click the Trace tab to modify the tracing settings.Settings
- Sensitivity: Use the slider or type a value to adjust sampling density. Too high a value can generate tracings based on nonspecific staining/fluorescence; too low can cause tracing to stop prematurely.
- Gap tolerance: Use the slider to change the maximum acceptable distance between two segments to make a connection.
- Remove traces shorter than: Check the box and enter a value to ignore objects that may be mistaken for traces in a noisy image.
- Connect branch segments: Check to have the program connect branches according to the Branch Connections Criteria defined in the Advanced Settings (see details in Advanced settings for automatic tracing).
- Click the Trace button to start tracing.
- To change the tracing settings, click the Clear Tracing button, readjust the settings, and click Trace.
See also Tracing trees in Smart manual mode , Tracing trees in User-guided mode, Editing trees