Image organizer
Purpose

|
To open the Image Organizer , click the Organizer button from the Image or Workspace ribbon. |
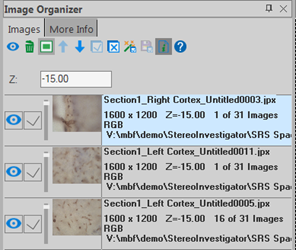
The Image Organizer displays the location and status of each of the images that are open in the main (2D) window (it doesn't apply to markers or tracings). It provides options for manipulating image appearance.
-
The features of the organizer are divided into two sections using tabs: Images and More info.
-
The images are listed in the order in which they were opened. The most recent image is listed at the top and appears in front of the other images where they overlap.
-
Blue highlight indicates that the image is selected.
-
Click a row and drag up or down to change the order of the images.
Images tab
Displays the location and status of each open image and provides some controls for manipulating image appearance.
Eye icon, checkbox, and opacity slider
- Click the Eye icon to turn visibility for a given image on or off.
-
Click the Checkbox to select an image or clear the box to deselect an image
-
To move a single image with Move Image or Move Image and Tracing, check the box.
-
To group images for use with Move Image, Move Image and Tracing, or Process, check the box for each image.
-
If your image does not move when using the joystick function, verify that the image is checked; only checked images are affected by the Move commands.
-
- Use the Opacity Slider to adjust the transparency of an image; the top of the slider corresponds to 100% opaque and the bottom to 0% opaque.
Z: write-in box
Z is a manual Z-depth adjustment tool. Use it in conjunction with the Serial Section Manager to match the display of the image with a specific serial section.
Right click functions
Right-click over the name of an image in the Image Organizer to select from the following actions:
-
Create sections from this stack: Click to create sections with an Evaluation interval set to 1 and a Cut thickness value set to the z spacing of the stack. Use this option for serially aligned physical sections in one image stack (see procedure).
-
Go to plane: Click to navigate to a specific plane. Enter the desired Z-plane in the dialog box that opens to display the corresponding image.
-
Change Image Scale: Click to open the Change Image Scaling window. The window displays the current image scaling on the left.
-
In the New Scaling section of the box, type in new values for X-, Y-, and Z-axis scaling.
[Click the Reset button to discard any values that you typed and reset to the current image scaling.]
-
If you have traced structures in an image with inaccurate image scaling, check the box to Adjust all tracings inside image to apply your updated scaling to any existing tracings within the selected image. Scale adjustments are not applied to tracings that extend beyond the selected image.
-
Click the OK button to apply the new scaling. [Or click the Cancel button to exit the dialog without making any changes.]
-
Image-tab toolbar reference

|
Turns visibility on or off for checked images. |

|
Discards checked images. |

|
Centers image in the Tracing window. |

|
Moves image up or down in the Image Organizer list (alternatively, you can drag and drop image thumbnails to reposition ). |

|
Checks (selects) all images. |

|
Un-checks (deselects) all images. |

|
Enables batch image processing for images of the same type (e.g., RGB or grayscale).
|

|
Saves modified images. |

|
Displays dimensions, z-depth (if the image is part of an image stack), type of image (e.g., RGB, gray scale), and file location. |
More Info tab
Information, such as acquisition settings, for the selected image is displayed on the More Info tab.
Select an image by clicking its description on the Images tab (it will turn blue when selected) to display its information on the More Info tab.
More Info tab toolbar reference

|
|