Create Movies in 3D
Overview
Use Movies to animate 3D images for presentation to others. You indicate positions in the 3D image that will be shown in the movie, and BrightSLICE software generates frames between those positions to animate moving from one to the next. Each movement creates a clip (segment) and Movies places them on a timeline. You can edit the timeline with bookmarks and customize the clips individually. After previewing and finalizing changes, you can save movies to have an editable file, and you can export for display and sharing.
|
|
Display the 3D image stack in the 3D Visualization window |

|
Click Movies to create movies of your images. |

Movie structure
Clips
-
A movie is a series of clips, assembled in chronological order on the timeline.
-
A clip is a series of frames (i.e., still images).
-
For each clip, you define the first and last frame. BrightSLICE software then creates an animation by generating frames between the first frame and the last frame.
-
Right-click in any clip in the timeline to see modification options, such showing/ hiding color channels in multichannel images.
Timeline
-
Modify the movie by changing the clips' positions and lengths in the timeline, or deleting clips.
-
Add bookmarks if desired.
Flight mode and standard mode
Flight mode creates movies that make viewers feel as though they are moving through the microscopy image, similar to flying in a video or using a virtual reality headset. The movie style feels more modern and dynamic compared to traditional BrightSLICE movie mode.
-
Flight mode: the camera travels through the scene (first-person navigation).
-
Standard navigation: the scene rotates, pans, and zooms relative to a stationary viewpoint.
Navigation in the image depends on if Flight Mode or standard mode is enabled. This affects how you will set start and end locations for clips.
-
When the Flight Mode box is checked, navigation is primarily keyboard based. A keyboard shortcut guide with commands is displayed in the top left of in the 3D Visualization window.
-
In standard mode (Flight Mode box is not checked), use the mouse and mouse wheel to navigate. See more about navigating in the 3D Visualization window here.
Creating movies
-
Set the first frame in the movie by zooming and panning to the desired start location for the movie. Click Set start position in the timeline.
How you navigate depends on whether the Flight mode box is checked (Flight mode is enabled) or unchecked (standard mode).
-
Navigate in the image to the next position that you want to show and click Set next position. A clip that moves the movie viewer from the start position to the next position is animated and added to the timeline.
-
Repeat the previous step, navigating to the next position and clicking Set next position as desired to add additional movements (clips) to the movie.
Another way to Set next position / add a clip is to type Ctrl+ spacebar on the keyboard if you are using standard mode or type C on the keyboard in Flight mode.
-
Click End sequence to finish.
Viewing a sequence of clips
Choose preview quality (this may affect playback speed of the preview, but these options do not affect the playback speed or resolution of exported movies):
Hi-Res preview: Plays the preview using the highest resolution of the loaded image.
Fast preview: Plays the preview using a lower resolution of the loaded image. If creating a movie with a large image, this can increase the speed of the preview.
Play

|
Click Playback to preview the movie. The playback will start from where the playhead is located in the clip sequence timeline. |

|
Click Next clip to advance to the next clip in the sequence. |

|
Click Previous clip to go back a clip in the sequence. |
Using the timeline to edit clips/movies
The timeline displays the sequence of clips. Each time you create a clip, it is added to the timeline.
The playhead represents a point of time in the video. 
Select part of the timeline:
-
Click and drag the playhead's blue handles to make the selection. The selected area is highlighted in blue.
-
Use the Zoom slider to change the scale of the timeline.

Select clip(s) on the timeline:
-
Click to select a clip; selection is represented with a solid color (rather than a paler version of the color).
-
Press Ctrl and click on multiple clips to select more than one.
Delete a clip: Click to select a clip, right-click and select Delete clip.
Add a clip in the middle of sequence:
-
Select the clip that will appear before the new click you want to insert.
-
Navigate to the position for the end of the new clip and click C on the keyboard or Set next position.
Your new clip will be generated and inserted into the timeline; its default clip name, i.e., Clip: 1, 2, 3 will reflect the order in which it was made.
Hide/Show tracing in a clip:
-
Click to select the clip. Right-click and choose Customize Clip....
-
In the Clip Customization window that opens, check the Hide tracing box. Note the symbol in the clip box indicating that the tracing is hidden.

Change the color channel displayed in a clip (for multichannel images):
-
Click to select the clip. Right-click and choose Customize Clip....
In the Clip Customization window that opens, color channel display options are shown.
-
Click to display all color channels in the image or check/uncheck the Display of individual color channels.
Split a clip into two clips; once split, you can move and edit each clip separately:
-
Click to select a clip, then click Split clip.

-
Move the cursor over the location for the split in the clip. You will see a vertical red line.

-
Click to split. The clip splits into two separate clips.
Extend the duration of a clip:
-
If needed, make room for the extension by selecting clips that are later in the timeline and dragging them to create space for the extension.
-
Click and drag the side of the clip to extend it.
Rename or change the color of a clip: Click to select a clip, then right-click and choose Customize Clip.... In the Clip Customization window that opens, there are controls for typing in a different name and changing the color on the timeline. Other customizations are also in this menu.
Clear the timeline: Click Clear timeline; you'll be asked to confirm this action before it proceeds.  .
.
Add bookmarks
Bookmarks make it easier to navigate while editing your movie; they will not be visible to viewers of the movie you create.
They are represented by orange markers. 
- To add a bookmark, drag the playhead to the desired frame, right-click the time axis and click Add bookmark here.

- Bookmarks are listed in the Bookmarks panel on the right. To display the view corresponding to a bookmark, click the name of the bookmark.

- To rename a bookmark, double-click the orange marker in the timeline.
- To move a bookmark, click the orange marker and drag it to the desired location.
Image display
There are multiple image display options in the 3D Visualization window. Click the radio button next in the Display Image as section to choose an option.
3D Volume: View your image in three dimensions.
Partial Projection: Displays a subset of an image stack in X, Y or Z. Use the radio buttons and slider to the right of the 3D Visualization window to adjust visibility.
- Select X, Y, or Z to display an axis.
- Drag the square on the slider to move along the axis.
- Drag one of the triangles on the slider to adjust how many planes are visible in the axis.
Slice: Use to display a single plane of an image stack in one or more axes (XY, XZ or YZ). Use the checkboxes and sliders to the right of the 3D Visualization window to adjust visibility.
- Check/uncheck XY, XZ or YZ to display/hide axes.
- To move along an axis, drag the slider for that axis OR click a slider and use the PageUp/PageDown keys to move one plane at a time.
3D Scale Bar: Check/uncheck Show scalebar to display/hide the 3D scalebar. You can change 3D scalebar settings in the Scene Display panel.
Flight mode controls
Enable flight mode: Check the box to create a movie in flight mode, which uses first-person navigation, providing a modern, VR headset feel to movies.
Navigation is primarily keyboard based in Flight mode: a guide to navigation keyboard shortcuts is displayed in the upper left of the 3D Visualization window; it is not included in movie exports.
Click in the viewing window to enable navigation, then use the keyboard commands.
Use the keyboard command C to Set next position to avoid having to click in and out of the viewing window while navigating to movie positions.
Mouse sensitivity: Adjust mouse responsiveness using the slider
Movement speed: Adjust movement speed of the navigation keyboard shortcuts.
Show shortcut guide: Display/Remove display of the Flight mode shortcut guide in the upper left of the 3D Visualization window. Note that this guide will not be included in movies.
Save and export a movie
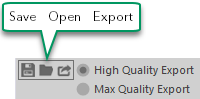
- Save: Click Save to save your movie for later editing (for example, if you need to close the 3D window before the movie is completed). It will be saved as an xml file.
To return to this xml file later, click Open.
- Export: Export the final version of your movie. Note that exported movie files cannot be edited in BrightSLICE software.
Choose the movie export quality:
High Quality Export: Loads the highest possible image based on available GPU memory.
Max Quality Export: Attempts to load more than 100% of available GPU memory for maximum resolution attainable resolution. This setting will increase movie export time.
Click Export. In the Export Movie window:
Click to navigate to the save location and name the file.
From the dropdown menu, choose the resolution to be used for the exported movie.
Click and the movie export begins. A BrightSLICE progress window opens to display the percent complete of movie creation operations.